Deploy Your Django Project In Ec2 Instance
Deploying one (or multiple) Django project(s) in a EC2 instance at AWS should be a relative easy task.
I have never been interested in becoming a Systems Administrator, I am a kind of developer that panics when messing up with servers and configuration files. But it looks like my actual job competences includes the deployment of some of the projects I have been working on.
So here I am, struggling trying to make our Django app work in a EC2 instance… and I am going to be honest here, I am enjoying it! I never thought that I would start to like DevOps.
Introduction
First of all, I am going to introduce some brief definitions, that I assume you probably know if you are reading this post. You can skip this part, if you want to go straight hands-on:
Django is a Python Web framework, for quick setup and easy development of Web applications.
AWS, as the link describes, is the most popular secure cloud services platform that offer a wide of utilities as cloud hosting services, database storage or content delivery, among others.
In AWS, an EC2 instance is a Web service that makes easy to obtain virtual services (computer instances in the cloud) fast and inexpensively.
Before starting
First of all, we need to compress and transfer our Django project from our local machine to our EC2 virtual server. I usually make use of the scp command to help me with file transfer with SSH:
scp -i your_permission_PEM_file your_django_project_compressed user_name@IP_EC2_INSTANE:"/path/where/to/locate/at/ec2/"
Once the transfer is completed, we need to access to our EC2 instance server with full administrative control, uncompress the file we recieved, and finally move our Django project to the desired working location in the file system.
Prepare nginx and uWSGI
nginx will work as our HTTP server and reverse proxy for our Django project. Why? Because we need something like nginx to face the outside world and be responsible of serving the media files (images, CSS, etc) directly from the file system. If it is not installed yet in our server we can:
sudo apt-get install nginx
However, nginx can not talk directly to Django applications; so we need something that will be responsible of running our app, feed it when we recieve requests from the web and return the responses: that is uWSGI.
A simple Django web application will be running in a server with three main processes - nginx, uWSGI and the database. The high-level overview of the lifecycle of an HTTP request to the server will look like:
- The incoming HTTP requests will be intercepted by nginx which listens port 80. If it is a static resource (css/js/images) Nginx serves it without bothering uWSGI.
- On the contrary, nginx will received all the TCP packets belonging to the HTTP request and forward the request to uWSGI which is listening on another port (usually 8000) for HTTP requests from nginx.
- uWSGI translates the request to a Web Server Gateway Interface compatible request and calls the Django applications which implements the business logic (including access and modification of the database) and returns an HTTP response to nginx which in turn sends the response back to the client.
Our server.ini file
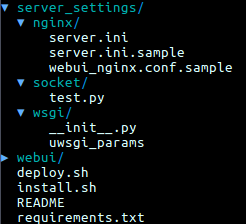
We now need to configure our django project to run with our nginx server. We need to create the configuration file server_settings/nginx/server.ini included in our project (we can copy and edit its sample file as a reference).
If you are using multiple websites on uWSGI, you may use a different name for this configuration file for every project.
[uwsgi]

chdir       = /PATH_TO_DJANGO_PROJECT
module      = webui.wsgi
home        = /PATH_TO_DJANGO_VIRTUALENV

socket = /ABSOLUTE_PATH_TO_REPOSITORY/server_settings/socket/webui.sock
chmod-socket = 666

master = true
vhost = true
no-stie = true
workers = 2
reload-mercy = 10
vacuum = true
max-requests = 1000
limit-as = 768
buffer-sizi = 30000
pidfile = ./uwsgi.pid
daemonize = ./uwsgi.log
‘chdir’, is the location of the /webui folder in our django project.
‘home’, is the location of the Python version we are going to use for our project.
‘socket’, is the location of our .sock file. A socket file is used to pass information between applications amongst other applications, we have to create when multiple websites with nginx a different socket file (change the file name for every project).
We may also want to modify the ‘pidfile’ and ‘daemonize’ value, pointing to the absolute path location of the uWSGI pid path, and the uWSGI log path, respectively.
We can check if our configuration is correct by running uwsgi. The following command should create and save the log files with all the relevant information:
uwsgi --ini server.ini
The nginx configuration file on Django
Now is time to copy and edit the webui_nginx.conf file located at the same path of our Django project (server_settings/nginx/). If you are using multiple websites on nginx, you may use a different name for this configuration file for every project.
# mysite_nginx.conf

# the upstream component nginx needs to connect to
upstream django {
    server unix://ABSOLUTE_PATH_TO_REPOSITORY/server_settings/socket/webui.sock; # for a file socket
    #server 127.0.0.1:8000; # for a web port socket (we'll use this first)
}

# configuration of the server
server {
    # the port your site will be served on
    listen      PORT_NUMBER;
    # the domain name it will serve for
    server_name .example.com; # substitute your machine's IP address or FQDN
    charset     utf-8;

    # max upload size
    client_max_body_size 75M;   # adjust to test

    gzip_comp_level 5;
    gzip_vary on;
    gzip_min_length 1000;
    gzip_proxied any;
    gzip_types text/plain text/css application/json applicationx-javascript text/xml application/xml+rss text/javascript;
    gzip_buffers 16 8k;


    # Django media
    location /media  {
        alias ABSOLUTE_PATH_TO_REPOSITORY/webui/media;  # your Django project's media files - amend as required
    }

    location /static {
        alias ABSOLUTE_PATH_TO_REPOSITORY/webui/static; # your Django project's static files - amend as required
    }

    # Finally, send all non-media requests to the Django server.
    location / {
        uwsgi_pass  django;
        include     ABSOLUTE_PATH_TO_REPOSITORY/server_settings/wsgi/uwsgi_params; # the uwsgi_params file you installed
    }
}
Here just modifiying the server file socket url, I eventually use unix sockets, it’s simplier, and there is less overhead than ports.
Also there is the need of modifying the port the site will be served from (‘listen’), the location of the static and media files (usually located inside the /webui folder), in addition of the non-media requests to the Django server.
It is very important, if we are going to run multiple websites with nginx, that the location of the ‘uwsgi_pass’ value should point to the proper upstream (better rename the upstreams, to avoid failures).
Get ready with nginx
Now is time to reestart nginx:
sudo /etc/init.d/nginx restart
Console should print a message like:
* Restarting nginx nginx [OK]
If the process fails, you can check if the config files are correct by running:
sudo nginx -t
I usually try to see what might be hogging the ports used by nginx by running netstat command. For instance, if nginx has to run two Django projects using the ports 80 and 8080, I run:
netstat -nlp | grep 80
It should print both ports listening with nginx. Now, we can check the running status using the following command:
ps aux | grep uwsgi
Let’s link the webui_nginx.conf file, with the nginx nginx site-enabled folder. Should be located in /etc/nginx/sites-enabled.
This directory is used to define configurations for our websites, usually symbolically linked to the sites-enabled directory when they are ready to go life. We are going to use:
ln -s /path/to/django/project/nginx/file.conf /etc/nginx/sites-enabled/
exec bash
Get ready with uWSGI
In this example, we are going to use uWSGI’s Emperor mode, which makes deploying multiple apps very simple.
uWSGI will simply search in a folder for the .ini files and spawn instances of our apps (Django, in this case). By convention, that directory is /etc/uwsgi/vassals/ and we need to create it if it is not already created.
Let’s create the symlink then:
ln -s /path/to/django/project/nginx/server.ini /etc/uwsgi/vassals/
With this step, we finished the deployment of our Django project in our EC2 instance. We now just need to test if it is working by opening the site in our browser.
Cheers!